This post contains affiliate links. If you purchase through our links, we may earn a commission at no extra cost to you.
Most n8n self-hosting tutorials bury the one setting that can permanently destroy every credential you’ve ever saved, then spend three paragraphs on things that don’t matter nearly as much. If you’re going to self-host n8n on Vultr, the encryption key deserves top billing, not a footnote. This guide covers the sizing decision, the Docker Compose stack, Nginx with real SSL, and the gotcha that trips up more people than any error message will. It also includes what n8n 2.40.7 actually used when we ran this guide’s own Docker Compose stack on a $5/month Vultr instance on September 29, 2026 — measured on our own test box, not quoted from someone else’s.

What n8n Actually Used on a $5 Vultr Box (Measured September 29, 2026)
Most n8n sizing advice, including the plan table further down, comes from other people’s setups, so we ran our own. On September 29, 2026, we followed Steps 1–3 of this guide on a fresh Vultr Regular Performance instance in Tokyo — the $5/month plan with 1 vCPU, 1 GB RAM, and a 25 GB SSD, running Ubuntu 24.04 (the image also ships with a 2.4 GB swap file). That’s deliberately smaller than the plan this guide recommends: we wanted to see where the cheapest box stands. We used the same commands, the same .env keys, and the same docker-compose.yml shown below, with randomly generated secrets. The untagged n8nio/n8n image pulled n8n 2.40.7, alongside PostgreSQL 16.15. Every figure below is a reading from that box, taken with docker stats, free -m, and df -h.
| What we measured | Result |
|---|---|
Steps 1–3, from SSH login to n8n answering on /healthz | 518 s of command time (about 9 minutes) |
— apt update && apt upgrade -y | 114 s |
| — Docker install (get.docker.com script) | 101 s (Docker 29.8.1, Compose v5.5.1) |
— docker compose up -d, including image pull | 256 s, then another 43 s of first boot and database migrations before /healthz returned OK |
| Image sizes | n8nio/n8n 1.73 GB, postgres:16 642 MB |
Disk used — OS, Docker, and images (df -h /) | 8.7 GB of 23 GB usable (5.9 GB on the fresh box) |
| Idle RAM, 2 minutes after a restart, no browser open | n8n 315 MiB, Postgres 38 MiB; whole host 677 MB used, 277 MB available of 955 MB |
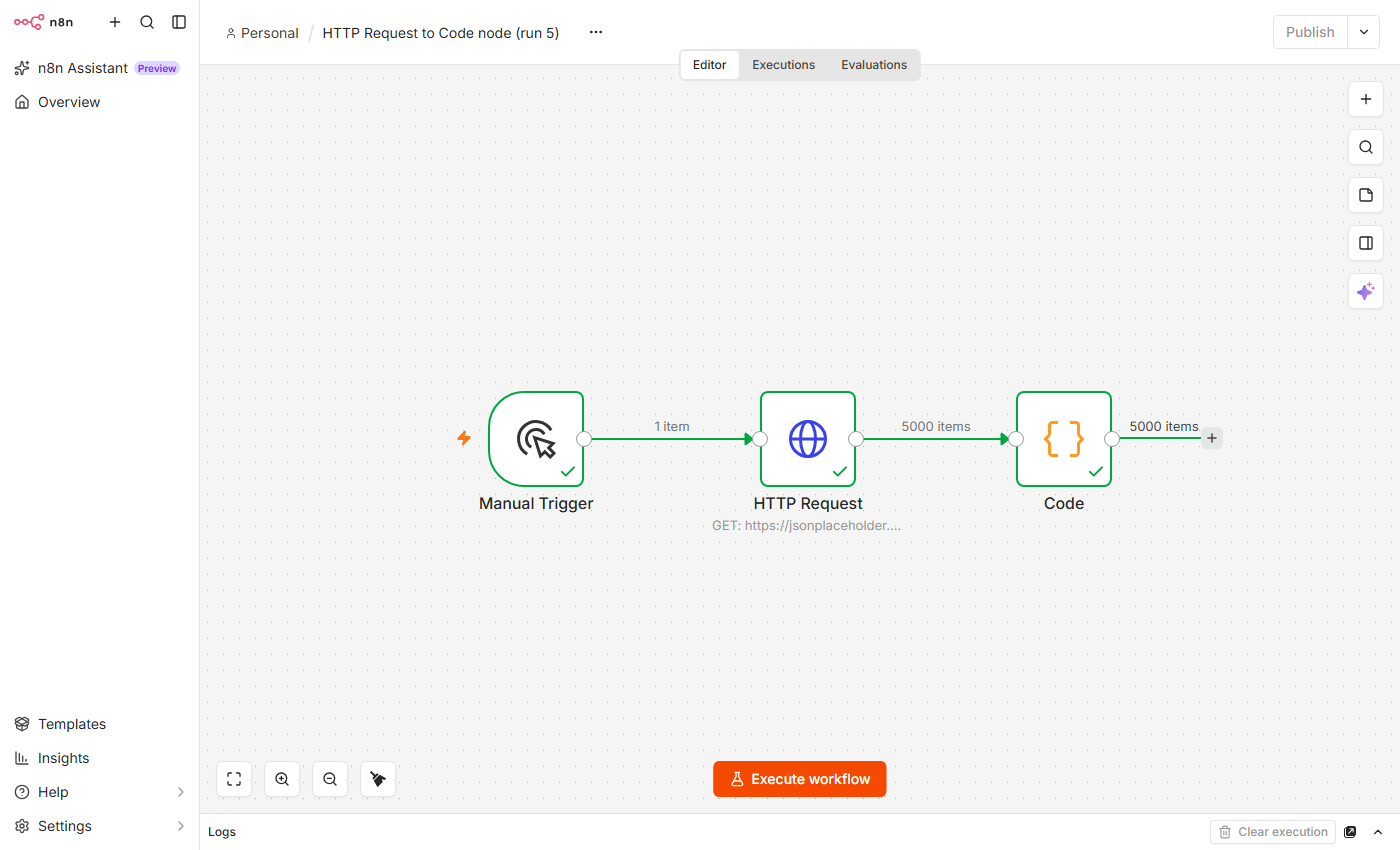
| Running Manual Trigger → HTTP Request → Code node over 5,000 items | Succeeded in 4.1 s; n8n peaked at 457.8 MiB, host available memory dipped to 133 MB |
| Stress test: one Code node generating 100,000 items of 1,000 characters each | Failed after about 76 s; n8n peaked at 599.1 MiB, swap use reached 827 MB, and n8n’s Postgres connections timed out |
| Out-of-memory kills during the whole run | None (no kernel OOM events, zero container restarts) |
Three things in that table matter more than the rest. First, the $5 plan does run this exact stack: the owner setup worked, and a realistic small workflow — fetching 5,000 records from a public test API and looping over every one in a Code node — finished in 4.1 seconds. Second, there’s almost no headroom. With n8n and Postgres idle, only 277 MB was left for everything else, and the box was already dipping into swap. Third, when we pushed it, the 1 GB box didn’t crash — it did something worse for debugging. The swap file kept the kernel from killing anything, but n8n slowed down until its database connections timed out, and the execution failed with a Postgres error (“Query runner already released”) that looks nothing like a memory problem. If you see database timeouts on a small n8n box, check free -m before you blame Postgres.
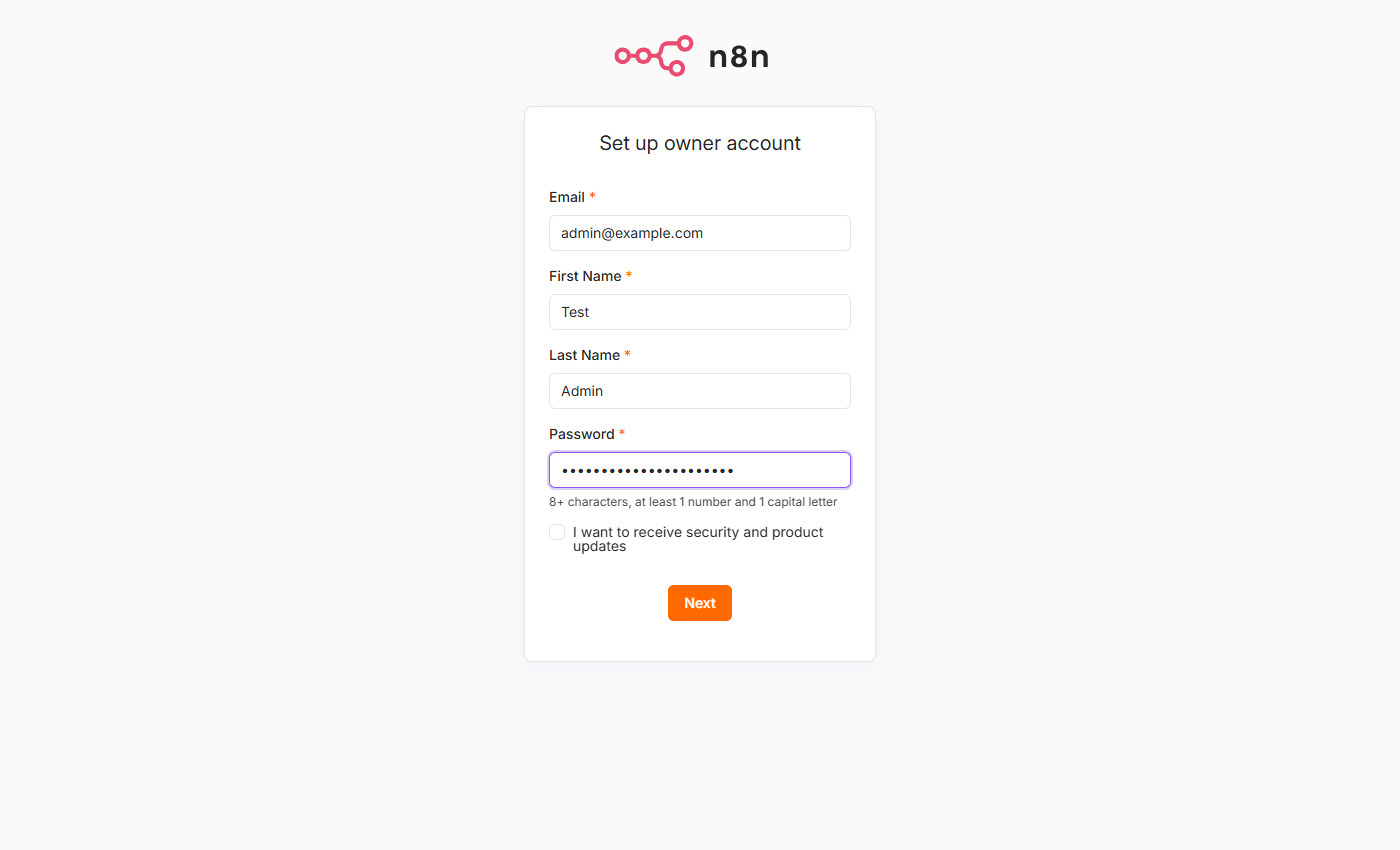
docker compose up -d: n8n 2.40.7’s owner-account form on our test instance, reached through an SSH tunnel before any domain or Nginx was set up (September 29, 2026).One limit on all of this: we ran the instance for about half an hour, not days. These are first-boot and single-user numbers — one execution at a time, no webhooks, no concurrent runs — and the 100,000-item test is deliberately extreme. It shows where the 1 GB plan breaks, not what a typical workflow needs. We also couldn’t test Certbot on a throwaway box without a real domain, so the TLS part of Step 4 is the one step here we didn’t run end to end.
Why Self-Host n8n on Vultr Instead of Using n8n Cloud
n8n Cloud’s Starter tier runs about €24/month for 2,500 executions, climbing to €60/month for 10,000 executions on the Pro tier — and that’s billed per execution, not per workflow. One workflow run counts as one execution no matter how many steps it has. Self-hosting the free Community Edition removes that cap entirely. You pay for the VPS and nothing else.
That doesn’t mean self-hosting is free, though — it just moves the cost from your credit card to your time. You’re now responsible for Docker updates, Postgres backups, TLS renewal, and the 2am page if the container falls over. For a solo automation builder running a handful of workflows, that trade is usually worth it. For a team that wants zero ops overhead, n8n Cloud is the more honest answer, even at the higher price.
What Vultr Plan Do You Need to Self-Host n8n?
n8n’s official minimum is 2 vCPU, 2 GB RAM, and 20 GB of storage — but that number is for testing, not for a server that’s actually going to run your automations reliably. The real constraint isn’t CPU. It’s RAM. Every active or webhook-triggered execution holds its entire payload in memory for the duration of the run, and a single webhook firing with a large JSON body can eat 150–300 MB on its own. Run three or four of those concurrently and a 2 GB box is out of headroom before the CPU even breaks a sweat.
Our own test backs up the RAM-first view. On the 1 GB plan, n8n 2.40.7 plus Postgres sat at 315 MiB and 38 MiB idle, a single 5,000-item run pushed n8n to 457.8 MiB, and a 100,000-item run pushed it to 599.1 MiB with 827 MB of swap in use before the execution failed. The CPU was never what gave out first — memory was.

| Vultr Plan | Price/mo | vCPU | RAM | Storage | Verdict for n8n |
|---|---|---|---|---|---|
| Regular Performance 1 vCPU (our test box) | $5 | 1 | 1 GB | 25 GB SSD | Runs n8n + Postgres and small workflows (measured), but only ~277 MB free at idle and a 100k-item run failed — for trying n8n out, not for automations you depend on |
| High Frequency 1 vCPU | $12 | 1 | 2 GB | 64 GB NVMe | Meets n8n’s bare minimum, but 1 vCPU bottlenecks concurrent runs — testing or light personal use only |
| High Performance 2 vCPU | $18 | 2 | 2 GB | 60 GB NVMe | Workable middle ground, but watch RAM headroom once Postgres and Nginx are running alongside n8n |
| High Performance 2 vCPU | $24 | 2 | 4 GB | 100 GB NVMe | The production sweet spot — matches the 4 GB RAM / 2 vCPU baseline independent sources converge on |
| High Frequency 2 vCPU | $24 | 2 | 4 GB | 128 GB NVMe | Same price point, Intel-based, more storage, slightly less bandwidth |
Prices last checked: 2026-07-05, from vultr.com/pricing; the $5 plan row is from our September 29, 2026 test.
This guide recommends the $24/mo, 2 vCPU / 4 GB plan as the one to actually buy. It’s the tier where independent sizing guides put comfortable production headroom for Postgres, Nginx, and a handful of concurrent workflow executions. We didn’t benchmark that plan ourselves; the reasoning is simple arithmetic from our 1 GB run — n8n and Postgres idle at roughly 350 MiB together, and one 5,000-item run with the editor open took n8n from 315 MiB to a 457.8 MiB peak, so a few concurrent runs quickly add up. The $5/mo 1 GB plan is fine for kicking the tires on n8n for a weekend. The $12/mo plan is fine if you’re just testing n8n on a weekend or running one or two lightweight personal workflows, but budget for the upgrade the moment you add a second automation that hits a third-party API regularly. If you want the full breakdown of every Vultr tier and where the hidden costs are, our full Vultr pricing breakdown covers bandwidth overages and snapshot costs that don’t show up on the sticker price.
Step 1: Provision Your Vultr VPS and Point DNS
Spin up a fresh Ubuntu 22.04 or 24.04 instance on the High Performance 2 vCPU / 4 GB plan. New Vultr accounts get $300 in free credit valid for 30 days, which comfortably covers a month or two of testing this setup before you’ve spent a dollar of your own money.
Once the instance is running, create an A record for a subdomain — something like n8n.yourdomain.com — pointing at the server’s IP address. DNS propagation is usually quick, but give it 10–15 minutes before moving to the SSL step, since Certbot’s verification will fail if the domain isn’t resolving yet.
SSH in and run the basics:
apt update && apt upgrade -y
adduser deploy
usermod -aG sudo deploy
Step 2: Install Docker and Docker Compose
n8n’s own containers handle the application, but you need Docker and the Compose plugin on the host first:
curl -fsSL https://get.docker.com -o get-docker.sh
sh get-docker.sh
usermod -aG docker deploy
The official get.docker.com script already installs the Compose plugin, so there’s no separate apt install docker-compose-plugin step — on our September 2026 test box that command just reported “already the newest version”. The script took 101 seconds on the $5 plan and installed Docker 29.8.1 with Compose v5.5.1.
Log out and back in so the group membership takes effect, then confirm with docker compose version. If you’ve already worked through a different stack on Vultr, this part will feel familiar — it’s the same install pattern covered in our Docker on Vultr setup guide, just pointed at a different set of containers.
Step 3: Set Up n8n and PostgreSQL with Docker Compose
Create a project directory and a .env file for secrets:
mkdir ~/n8n && cd ~/n8n
nano .env
Before you go any further:
N8N_ENCRYPTION_KEYis the single most important line in this file, and it’s the part almost every other n8n tutorial treats as an afterthought. If you don’t set it explicitly, n8n generates a random one on first run and stores it inside the container’s data directory. Lose that volume, recreate the container without mounting it correctly, or let an update wipe the config file, and n8n silently generates a new key — every saved credential in every workflow becomes permanently unreadable. There’s no recovery path, no master password, no support ticket that fixes it. This isn’t a theoretical risk; it’s a recurring thread on n8n’s own community forum from people who hit it after a routine update.
Generate a strong random string (32+ characters) — openssl rand -hex 32 prints a 64-character one, and it’s what we used on our test box — and set it explicitly:
N8N_ENCRYPTION_KEY=your-own-32-plus-character-random-string
POSTGRES_USER=n8n
POSTGRES_PASSWORD=use-a-real-password-here
POSTGRES_DB=n8n
GENERIC_TIMEZONE=America/New_York
Write that key down somewhere outside the server too — a password manager, not just a note in the volume you’re about to back up. If the volume and the key live in the same place, you haven’t actually protected anything.

Now the docker-compose.yml itself. SQLite is n8n’s default and it’s fine for a quick test, but it hits write-lock contention under concurrent executions — PostgreSQL is the right call the moment this is anything more than a toy:
services:
  postgres:
    image: postgres:16
    restart: always
    environment:
      POSTGRES_USER: ${POSTGRES_USER}
      POSTGRES_PASSWORD: ${POSTGRES_PASSWORD}
      POSTGRES_DB: ${POSTGRES_DB}
    volumes:
      - postgres_data:/var/lib/postgresql/data

  n8n:
    image: n8nio/n8n:2.40.7
    restart: always
    ports:
      - "127.0.0.1:5678:5678"
    environment:
      - N8N_ENCRYPTION_KEY=${N8N_ENCRYPTION_KEY}
      - N8N_HOST=n8n.yourdomain.com
      - N8N_PORT=5678
      - N8N_PROTOCOL=https
      - N8N_PROXY_HOPS=1
      - WEBHOOK_URL=https://n8n.yourdomain.com/
      - GENERIC_TIMEZONE=${GENERIC_TIMEZONE}
      - DB_TYPE=postgresdb
      - DB_POSTGRESDB_HOST=postgres
      - DB_POSTGRESDB_USER=${POSTGRES_USER}
      - DB_POSTGRESDB_PASSWORD=${POSTGRES_PASSWORD}
      - DB_POSTGRESDB_DATABASE=${POSTGRES_DB}
    volumes:
      - n8n_data:/home/node/.n8n
    depends_on:
      - postgres

volumes:
  postgres_data:
  n8n_data:
Two settings here are easy to skip and both cause real bugs: WEBHOOK_URL has to match the public HTTPS domain exactly, or third-party services firing webhooks at n8n will never reach it. N8N_PROXY_HOPS=1 tells n8n to trust the X-Forwarded-* headers coming from Nginx — leave it out and you’ll see cookie and webhook oddities that look like unrelated bugs. Notice the n8n container only binds to 127.0.0.1:5678 — it’s never exposed to the public internet directly, only reachable through Nginx.
One change from older versions of this guide: the image is now pinned to a version tag. With a bare n8nio/n8n, every docker compose pull silently jumps to whatever n8n released last — ours pulled 2.40.7 — and surprise major-version upgrades are exactly the kind of “routine update” the encryption-key warning above is about. Pin the current version, read the release notes, and bump the tag on purpose.
If you’d rather manage Postgres as its own long-lived service instead of a throwaway container, our PostgreSQL on Vultr guide walks through that setup, including backup scheduling.
Bring the stack up:
docker compose up -dThe first start is slower than you might expect: the two images add up to about 2.4 GB (1.73 GB for n8n, 642 MB for Postgres), and on our $5 test box docker compose up -d, pull included, ran for 256 seconds. n8n then spent another 43 seconds on first-boot database migrations. Don’t assume it’s broken if the next step fails right away — check that n8n is actually answering first:
curl -s http://127.0.0.1:5678/healthzIt returns {"status":"ok"} once n8n is ready. You may also see “Failed to start Python task runner in internal mode … Python 3 is missing” in docker compose logs n8n. We saw it on 2.40.7 too; it only affects Python in the Code node, and JavaScript Code nodes ran fine in our test.
Step 4: Configure Nginx as a Reverse Proxy with SSL
Install Nginx directly on the host — not in a container — along with Certbot:
apt install nginx certbot python3-certbot-nginx -yCreate a server block for your subdomain:
server {
    listen 80;
    server_name n8n.yourdomain.com;

    client_max_body_size 50M;

    location / {
        proxy_pass http://127.0.0.1:5678;
        proxy_set_header Host $host;
        proxy_set_header X-Real-IP $remote_addr;
        proxy_set_header X-Forwarded-For $proxy_add_x_forwarded_for;
        proxy_set_header X-Forwarded-Proto $scheme;
        proxy_set_header Upgrade $http_upgrade;
        proxy_set_header Connection "upgrade";
        proxy_read_timeout 300s;
        proxy_send_timeout 300s;
    }
}
💡 Tip: Want a head start on the config? Our free Nginx Config Generator builds a working server block you can adapt to your setup.
Three details in that block matter more than they look: the Upgrade/Connection headers keep the n8n editor’s WebSocket connection alive, client_max_body_size 50M stops larger workflow payloads and file uploads from getting rejected with a 413, and the extended timeouts stop Nginx from cutting off long-running workflow executions mid-request. Skip any of these three and you’ll eventually hit a bug that looks like an n8n problem but is actually Nginx quietly getting in the way.

Enable the site and run Certbot:
ln -s /etc/nginx/sites-available/n8n /etc/nginx/sites-enabled/
nginx -t && systemctl reload nginx
certbot --nginx -d n8n.yourdomain.com
We checked the server block above on our test box: nginx -t passed, and after the reload a request sent with Host: n8n.yourdomain.com reached n8n’s /healthz through Nginx and got a 200 back. What we couldn’t run there is Certbot, because a throwaway server has no real domain pointing at it — so the certificate step below comes from Certbot’s standard Nginx flow, not from our test.
Certbot rewrites the server block for HTTPS and sets up auto-renewal. n8n is built to run fully over HTTPS in production — plain HTTP triggers warnings and degraded behavior on OAuth credentials and webhook-dependent nodes, so don’t treat this step as optional.
Step 5: Lock Down the Firewall and Log In
Before you open the editor to the world, restrict UFW to only the ports Nginx and SSH actually need:
ufw allow 22
ufw allow 80
ufw allow 443
ufw enable
💡 Tip: Prefer a visual approach? You can build these rules with our free Firewall Rule Builder — it generates ufw and iptables commands right in your browser.
Two things we noticed on our Ubuntu 24.04 test box. UFW was already switched on out of the box, with incoming traffic denied except SSH, so on Vultr these commands mostly add ports 80 and 443. And ufw enable asks “Command may disrupt existing ssh connections. Proceed with operation (y|n)?” — answer y (port 22 is already allowed). If you script this step, use ufw --force enable instead; when the prompt can’t be answered, it simply aborts.
Port 5678 stays closed to the public internet entirely — it’s only reachable through Nginx on localhost, which is exactly how the compose file bound it. On our test box, a connection to port 5678 from outside timed out, as it should. If you haven’t set up a firewall on a fresh Vultr box before, our Vultr firewall walkthrough covers the same UFW basics in more depth.
Visit https://n8n.yourdomain.com and you should land on n8n’s setup screen to create your owner account — the form shown in our screenshot near the top of this guide. On 2.40.7 it asks for an email, first and last name, and a password of 8+ characters with at least one number and one capital letter. After that, n8n shows a short “Customize n8n to you” survey and then an optional free-license-key prompt; both can be skipped. From there, take a snapshot of the instance before you start building real workflows — it’s a five-minute safety net against the encryption-key disaster covered above.
A Note on n8n’s License: Fair-Code, Not Fully Open Source
This part often gets skipped in self-hosting tutorials, and it’s worth two minutes of honesty. n8n runs under the Sustainable Use License, which its maker calls “fair-code” rather than fully open source. In practice: self-hosting n8n for your own business automation or personal use is completely free, and you’re explicitly allowed to offer paid consulting or workflow-building services around it without any separate agreement. What you can’t do without a commercial partnership is resell a product whose core value comes from n8n, or embed it as a feature inside something you sell (OEM use).
For the vast majority of readers following this guide — automating your own business, your own team’s internal processes, your own side project — this changes nothing. But if you’re building a product to sell that’s essentially “n8n with a wrapper around it,” read the actual license before you launch, not after.
Self-Host n8n on the $24 Plan, Not the $12 One
If you’re automating your own workflows and want to avoid n8n Cloud’s execution caps, self-hosting n8n on Vultr is a straightforward win — buy the $24/mo, 2 vCPU / 4 GB plan, not the $12/mo one (our $5 test box ran n8n, but with only 277 MB to spare at idle), and set your N8N_ENCRYPTION_KEY explicitly before you save a single credential. Skip that one step and you’re one bad update away from losing every workflow’s credentials with no way to get them back.
This setup isn’t for everyone, though. If you don’t want to own Docker updates, Postgres backups, and certificate renewals, n8n Cloud’s Starter tier is worth the €24/month just to make it someone else’s problem. But for a developer or small team comfortable with a terminal, a $24/mo Vultr instance running this exact Docker Compose stack is the setup this guide recommends — sized for real automation work, and cheap enough that the execution cap on n8n Cloud never becomes a reason to compromise on what you build.